
The Members plugin lets you save your roles to a file and load them onto another WordPress site. This is handy if you want to:
- Move your role setup from a staging site to your live site
- Reuse the same roles across multiple sites you manage
- Back up your roles before making big changes
Both options live on the Members → Roles page in your WordPress admin.
Export Roles
You can export either all your roles at once, or just the ones you choose.
Export everything
Click the Export All button at the top of the Roles page. This downloads a single file containing:
- All your roles and what they’re allowed to do
- Your Members plugin settings
Export only certain roles
- On the Roles page, tick the checkbox next to each role you want to export.
- Open the Bulk actions dropdown and choose Export.
- Click Apply.
The downloaded file contains only the roles you ticked. Plugin settings aren’t included with this option — use Export All if you also want your settings.
Keep the downloaded file somewhere safe. You don’t need to open or edit it.
Import Roles
Importing happens in two steps so you can review everything before anything is changed on your site.
Step 1 — Upload your file
- On the Roles page, click Import. A panel will appear.
- Choose the file you exported earlier.
- If your file includes plugin settings and you also want to bring those in, tick Also import Members plugin settings.
- Click the upload button.
The file needs to be a .json file under 2 MB that was exported from the Members plugin. If something is wrong with the file, you’ll see an error and can try again.
Step 2 — Review and confirm
You’ll see a preview page listing every role in your file.
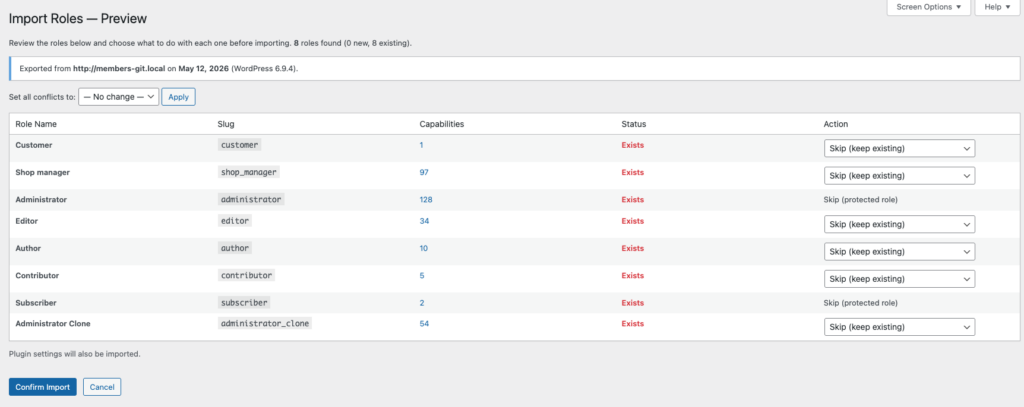
The Import Roles preview screen lets you decide what happens to each role before any changes are made.
For each role, you’ll see:
- The role’s name
- How many capabilities it has (click to see the full list)
- Whether it’s New (doesn’t exist on this site yet) or Exists (a role with the same name is already here)
- A dropdown to choose what to do with it
Choosing what to do with each role
- New roles: Choose Import to add it, or Skip to leave it out.
- Roles that already exist: Choose one of:
- Skip — leave the existing role unchanged
- Overwrite — replace the existing role with the imported one
- Import as new (Rename) — bring it in under a different name, leaving the existing role untouched. You’ll be prompted to enter a new name for the imported role.
- Protected roles are automatically set to Skip and can’t be changed. These are roles that are too risky to overwrite:
- The Administrator role
- The role you’re currently logged in as
- Your site’s default role (the role new users get when they register, usually Subscriber)
If you have lots of conflicts to resolve, use the Set all conflicts to dropdown at the top to apply Skip or Overwrite to all of them at once.
When you’re happy with your choices, click the confirm button. You’ll see a summary telling you what happened — for example: “3 roles imported. 2 roles skipped. Plugin settings imported.”
Good to know
- Don’t wait too long to confirm. If you upload a file but don’t finish the import within 30 minutes, you’ll need to upload it again.
- The Administrator role is always protected. Even if your import file contains an Administrator role, it will never be overwritten. This is to make sure you don’t accidentally lock yourself out.
- Back up first. Importing can change or replace roles on your site. We recommend taking a full site backup before importing, just in case.
- File size limit: Import files must be under 2 MB. This is plenty for most sites, but if you have a very large number of custom roles, you may need to export them in smaller batches.